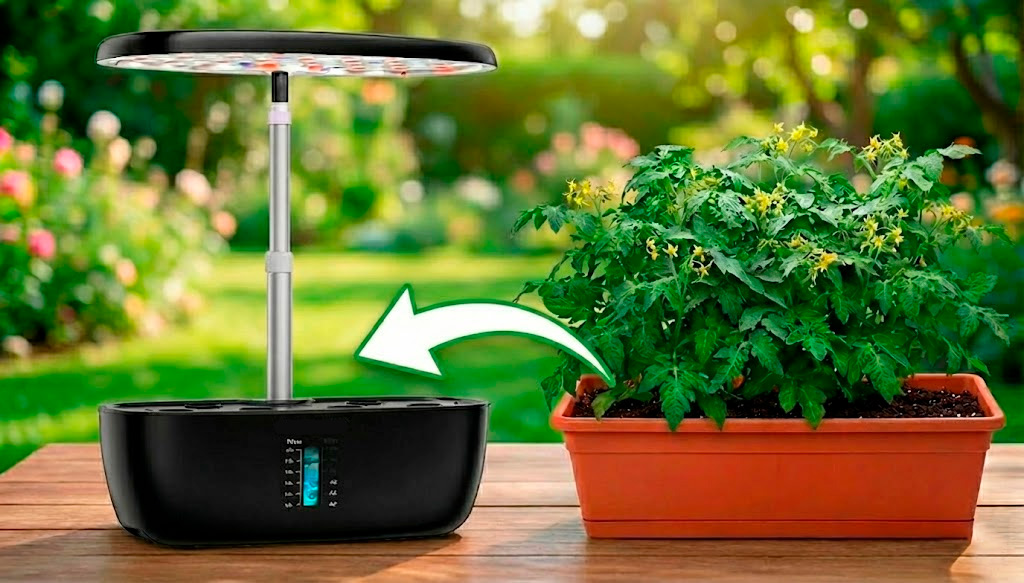
Many growers think that once a plant takes root in soil, there’s no going back. However, moving plants from your outdoor garden or a traditional pot into your SmartGarden is not only possible — it’s a great way to save plants before winter hits or to jumpstart your indoor growing.
Below, we walk you through the process step by step so you can pull off this “surgery” successfully and turn your soil-grown plants into hydroponic champions.
Note: This article includes AI-generated images and illustrations to enhance your reading experience.
1. Can you transplant soil-grown plants into a hydroponic system?
The short answer is: yes.
It’s entirely possible, but it requires technique. The transition from a solid medium (soil) to a liquid one (water) is a drastic change for the plant.
- Advantages: You save weeks by not starting from seed, and you can bring your favorite varieties indoors — that pepper or basil you love — so they keep producing year-round.
- Limitations: Not every plant will survive the stress, and there’s a risk of introducing pests or pathogens from the soil into your system’s sterile water.
2. Which plants are ideal for transplanting (and which aren’t)
Ideal:
- Aromatic herbs: Basil, mint, oregano, and parsley tend to adapt very quickly.
- Leafy greens: Small lettuce plants, Swiss chard, or kale, as long as they’re young seedlings.
- Strawberries: Excellent candidates, especially those grown from rooted runners.
- Ornamentals: Coleus and pothos.
What to avoid:
- Plants with long taproots, like carrots or radishes.
- Overly mature or woody plants, like very old rosemary.
- Any plant showing visible pests (aphids, whiteflies) or fungal issues.
3. Materials you’ll need
Before pulling the plant from the soil, have everything ready to minimize the time the roots spend exposed to air:
- New grow sponges (branded or generic)
- Sharp scissors sterilized with alcohol
- A large bowl of room-temperature water
- A tray to work on without making a mess
- Tweezers for handling small roots
- Optional support material: clay pebbles (LECA), foam pieces, or clean small stones
4. How to prepare the plant before transplanting
Success starts before you even touch the plant:
- Pre-watering: Water the pot a few hours beforehand. Moist soil clings less to the roots and makes extraction easier.
- Selection: Choose a vigorous plant with no yellowing leaves and a compact shape.
- Extraction: Remove the plant carefully, trying to keep the root ball as intact as possible.
5. How to wash the roots to remove all soil
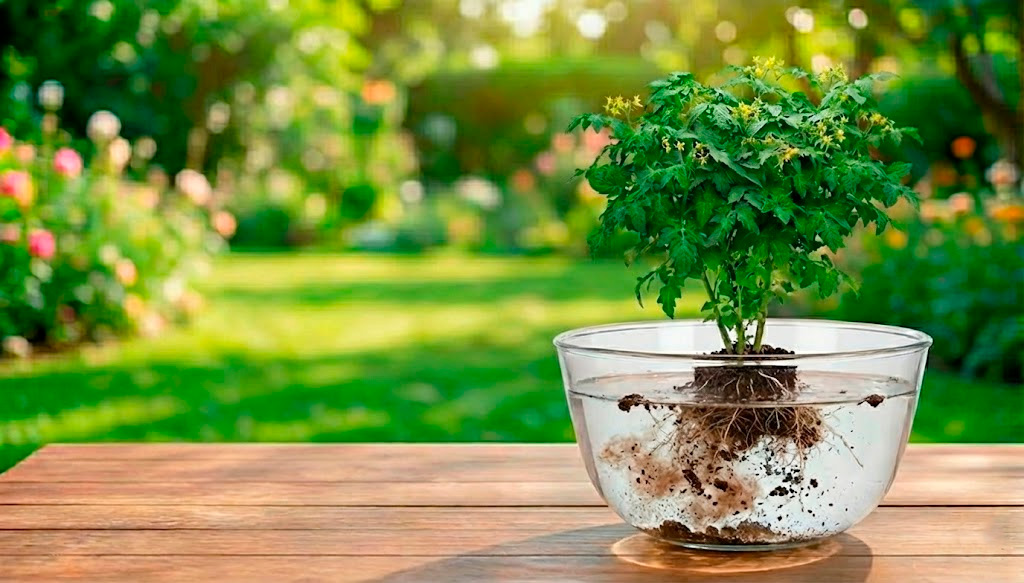
This is the most delicate step. The goal is to get the roots completely clean without damaging them.
- The technique: Submerge the root ball in the bowl of warm water (68–72 °F is ideal).
- Gentle motion: Gently swirl the plant under the water so the soil loosens on its own. Use your fingers to carefully massage any stubborn clumps.
- Water changes: You’ll likely need to change the water in the bowl 2 or 3 times until it runs clear.
- Critical mistake: Don’t use a direct, high-pressure stream from the faucet — this breaks the microscopic root hairs the plant needs to absorb water.
6. How to trim the roots if needed
Once clean, the root system may be too large to fit in the pod.
- When to cut: If the roots are too long to fit inside the pod, or if you see brown roots or signs of rot.
- How much to cut: You can trim up to the bottom third without any problem. In addition to making placement easier, this encourages the plant to grow new roots adapted to water.
- Cleanup: Remove any dark, slimy, or dead roots. Only white or light-colored, firm roots should remain.
7. How to place the plant in the system
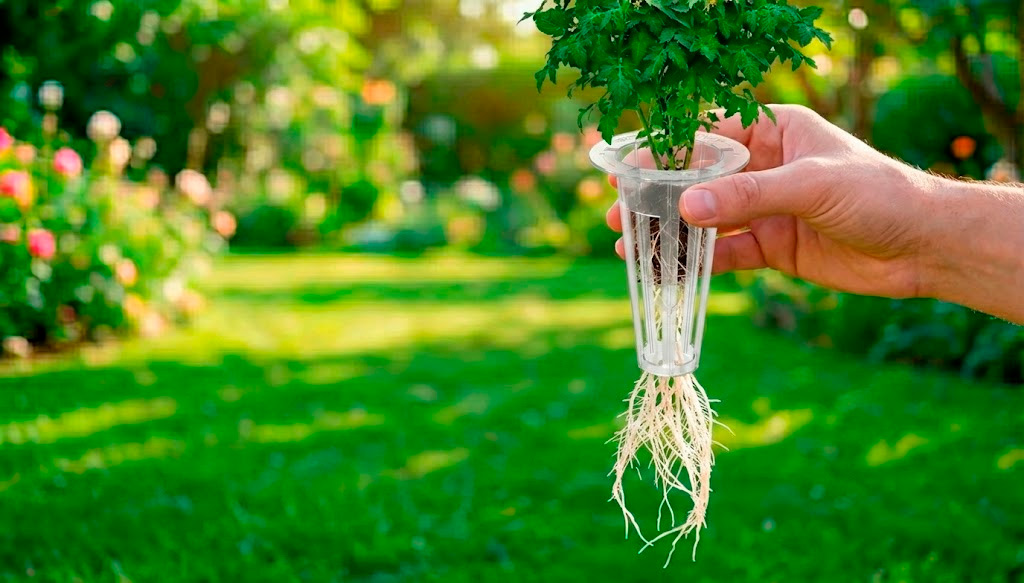
The technique here differs from working with seeds, since the plant already has a formed stem.
- Take a new grow sponge and make a vertical cut with a box cutter down to the center, like splitting a dinner roll.
- Place the plant’s stem inside the cut, leaving the roots hanging out below.
- Insert the sponge with the plant into the plastic pod. Take your time with this step: the roots need to pass through to the other side of the pod.
Tip: If the plant feels unstable or leans, fill the remaining space in the pod with clay pebbles, extra sponge pieces, or clean small stones. The key is that it stands firm and upright; the support material is secondary as long as it’s inert.
8. First care steps after transplanting
The roots have just been through an “operation” and won’t be functioning at 100% for the first few days.
- Foliar moisture (crucial): Since the roots are in shock, the plant needs to hydrate through its leaves. Mist the leaves several times a day for the first 3 days.
- Reduced light: Lower the lamp to its lowest setting or dim it if your system allows. You don’t want to push photosynthesis while the plant is recovering.
9. How to reduce transplant shock
Shock shows up when the plant looks sad and droopy right after transplanting. To minimize it:
- Clear plastic bag: Cover your SmartGarden with a clear plastic bag. This stabilizes ambient humidity and speeds up recovery considerably. Remove it after 48 hours — leaving it on longer encourages fungal growth that can seriously harm the crop.
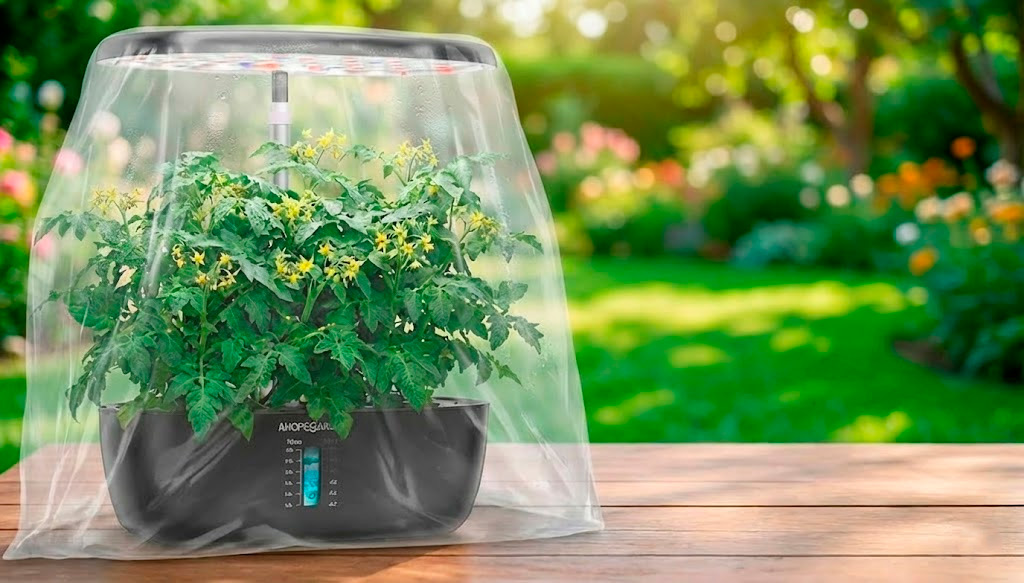
- Stable temperature: Keep the system away from cold drafts or excessive heat.
If after 48 hours the plant shows no signs of recovery, you can use HydroScan to assess its condition: upload a photo to the system and indicate how many hours have passed since the transplant. If the issue appears to be root-related, RootDoctor can help you confirm whether there are signs of rot or water-adaptation problems.
10. Most common mistakes
- Leaving soil residue behind: Organic matter rots in water, clouds the tank, and can clog the pump. Root washing must be thorough.
- Too much light from day one: It’s like asking someone who just came out of surgery to run a marathon. Intense light in the first hours makes stress worse.
- Forcing the plant into the pod: The stem is fragile during transplanting. If it doesn’t go in easily, adjust the sponge or the cut before trying again.
11. When to add nutrients and at what dose
- Days 1 to 4: Water only. Cut or damaged roots are open wounds — adding fertilizer at this stage will chemically burn them.
- From day 5 onward: If the plant looks stable, add a light dose (half or less of the manufacturer’s recommendation).
- Week 2: You can move to the full recommended dose.
12. Tracking the first 7 days
| Days | What to expect |
|---|---|
| 1 – 2 | Slightly drooping leaves. This is normal. Keep up the foliar misting. |
| 3 – 4 | The plant starts regaining firmness. Stems stiffen up. |
| 5 – 7 | New, thin white roots appear coming out of the sponge: the first true “water roots.” |
13. How to tell if the transplant was successful
- The plant resumes vertical growth and produces new leaves.
- When you lift the system’s cover, you see white, bright roots — very different from soil roots, which tend to be darker.
- The tank water level drops: the plant is actively drinking.
Frequently Asked Questions
What if a little soil is left on the roots? Try to remove at least 95% of it. A few tiny particles won’t ruin the system, but if muddy residue remains, you’ll run into algae problems and pump clogs.
Does this work for large plants? It’s much harder. The bigger the plant, the higher its demands and the more its roots suffer from being handled. Ideally, transplant young seedlings between 2 and 4 inches tall.
Can I transplant plants that are flowering or fruiting? It’s possible, though more difficult. The plant will direct all its energy toward preserving the flowers and fruit rather than generating new roots, which usually ends in the flowers dropping. If you have to do it, remove some flowers and fruit before transplanting to redirect energy toward the roots.
A second life for your plants
Moving plants from soil to water is like giving them a “luxury suite” where they’ll never go without — but the adjustment needs to be handled with care. Don’t get discouraged if a leaf or two turns yellow at first; it’s a natural part of the process.
Mastering this technique opens up a world of possibilities: from rescuing your favorite herbs before the winter frost, to speeding up your indoor production without waiting weeks for a seed to germinate. Go ahead, get your hands dirty (then wash them well), and give your plants a new home in your SmartGarden!